
primary-image, l
(article, Helen Rennie)
primary-image, l
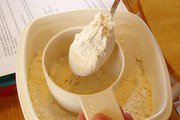
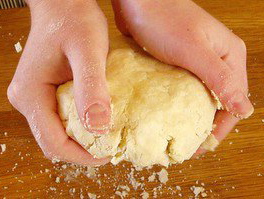
[%pageBreakSettings nobreak=true][%adInjectionSettings noInject=true] p(blue). Editor's note: Helen Rennie wrote the Front Burner column from January to June 2007. I wish I could tell you that making pie dough is, well, easy as pie, but I can't. In fact, I resent all those recipes that tell you how easy it is to make pâté brisée (tart dough): Rub the butter and flour together, add a little ice water, don’t handle too much, and you're done. If it were that easy, there’d be lots more good pies and tarts in this world. [[block(sidebar). h1.Featured recipe]] I set out on the tart quest years ago, after spending a semester in France. More than 50 tarts later, I can finally say that I have achieved perfection, though I don’t see a reason why perfect pie dough should take this much experimentation. If only the recipes spent more time on the basics and less time on the “butter vs. shortening” and “all-purpose vs. pastry flour” debates, I think we’d be set. The thing is, it’s all about technique, not ingredients. All-purpose flour is just fine. And I prefer using all butter since it gives the dough more flavor. The rest, as they say, is in the wrist. h4.Tart and pie dough with a stand mixer These instructions describe how to make tart dough with a stand mixer, which I find to be the easiest method. You could also use a food processor or a pastry blender. This recipe makes enough for two 10-inch tarts (savory or sweet). [%image butter float=right size=medium caption="Cut the butter into small cubes."] Ingredients 2 1/2 sticks (20 Tblsp.) butter, chilled 3 cups (13 1/2 ounces) unbleached all-purpose flour 1 tsp. table salt (or 2 tsp. kosher salt) 2 tsp. sugar 1 cup ice water 1 tsp. distilled white vinegar Step 1: Freeze the bowl and the flat beater of a stand mixer until cold, about 5 minutes. Step 2: Cut the butter into 1/4-inch cubes. Place on a plate and freeze for 10 to 15 minutes, but no longer. You want the butter to be very firm, but not rock hard. Step 3: Measure the flour. Precision is extremely important here. If you end up with too much flour (which is what happens if you scoop it with a measuring cup), your dough will be tough and hard to roll out. Measuring flour by weight is the only accurate way. [%image flour4 float=right caption="Level off excess with a knife."][%image flour3 float=right caption="Spoon, don't scoop."] So if you have a scale, use it to measure 13 1/2 ounces flour. If you don’t have a scale, stir the flour with a spoon to fluff it, spoon it into a measuring cup, and level off excess with a knife. Do not scoop flour with a measuring cup, as you will compress it. Step 4: Attach the chilled bowl and the flat beater to your mixer. Add the flour, salt, and sugar. Mix on low speed until combined, about 30 seconds. Step 5: Add the butter and toss with your hands to coat each butter cube with flour. Cover the mixer with a towel to avoid flour splashes, and mix on low until the butter lumps are the size of peas and the mixture is the consistency of oatmeal. [%image palm width=300 float=right caption="Turn dough out onto the counter and push at it with your palms. This creates layers of butter and flour and makes your dough more flaky."] It’s better to under-process than over-process. Since the bowl is covered with a towel, stop the mixer every 20 seconds to see how it’s going (it's likely to take about one minute total). If chunks of butter get stuck, scrape down the bowl with a rubber spatula. Step 6: Add the vinegar to the ice water and mix well. Measure out 1/2 cup of this liquid (without ice cubes). With the mixer running on low, slowly drizzle 1/2 cup of liquid into the dough. After all the water is in, give it another 5 seconds and turn off the mixer. Pick up a chunk of dough and squeeze it in a fist. If the dough holds its shape, it’s done. If it still feels sandy and falls apart as soon as you let it go, turn the mixer back on and drizzle in more water, 1 tablespoon at a time. Test after each addition. [%image boss float=right size=medium caption="Show the dough who's boss."] Step 7: Turn out the dough onto a clean counter and arrange it into a large rectangle (8 inches by 15 inches). Starting on one short side of the rectangle and working your way to the other, smear each bit of dough with the heel of your hand in short quick strokes. The whole procedure should take about 30 seconds, so be quick or the butter will start to melt. This creates layers of butter and flour and will make your dough more flaky. Gather up the dough with a pastry scraper. Divide the dough into two piles. Step 8: Force each pile into a thick disk. It might not want to stay together, but you need to show it who's boss. If it's too crumbly, knead it briefly (just four or five folds and turns). Sprinkle each disk with flour on both sides, wrap tightly in plastic, and refrigerate at least for two hours and up to two days, or freeze for up to two months. Roll it out when you need to bake it, and perfection, too, can be yours. p(bio). Helen Rennie is a food writer and cooking teacher living in Boston. This column was adapted from a post on her blog, Beyond Salmon. Elsewhere on Culinate: An Our Table about the emotions of making pie.

butter, l
flour3, l

flour4, l

palm, l

boss, l
reference-image, l