reference-image, l
(post, Marisa McClellan)
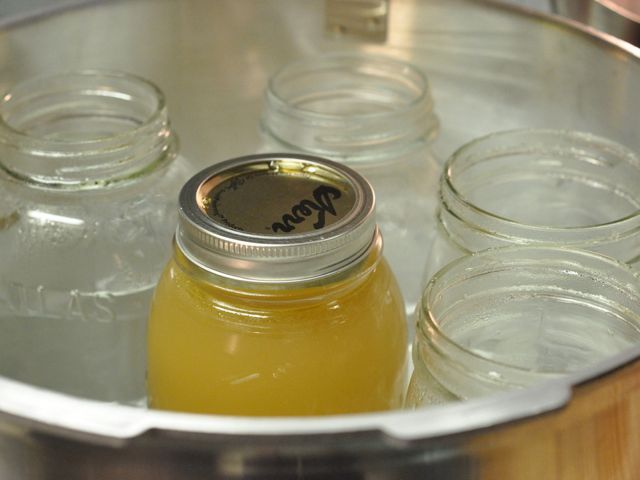
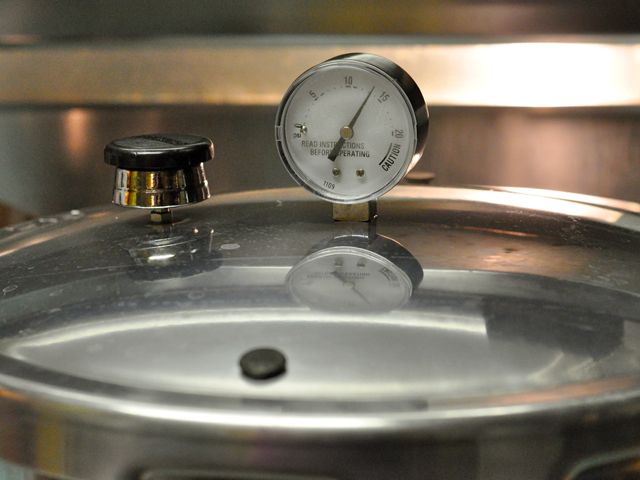
When I make stock from leftover bones or vegetable scraps, I feel like I’m pulling off the con of the century. Forget turning base metals into gold. As far as I’m concerned, the true alchemy of life is combining the remains of a roast chicken with some flaccid bits of produce and a lot of water and creating a flavorful, enriching elixir. Truly, it’s downright magical. And yet, very few people I know are doing it.

Why aren’t more of us making stock at home instead of opting for those oversized juice boxes of industrially produced, homogeneously flavored liquid? After all, the ingredients are practically free (beef, chicken, or ham bones all make lovely stocks), and the work involved is minimal.

I think the answer comes down to storage. Making stock is all fine and good, but if you happen to be living with a small freezer, it’s far too easy to fill the whole thing up with bulky containers of stock in a single day of cooking. Then there’s the issue that the stock is never actually defrosted when you want to use it. What’s a home cook to do?

I have two words for you: Pressure canner.

When it comes to canning, there are some hard-and-fast rules. One is that you cannot use a boiling-water bath — the most common canning method, used for preserving jams and pickles — to can low-acid foods. And homemade stocks are woefully low in acid.

However, food scientists have discovered that you can process jars of homemade stock in pressure canners safely and without fear of botulism. This means that you can make your stock at home and safely seal it into pint and quart jars.

[%image reference-image float=right width=400 caption="Make stock, then can it."]

Learning to pressure-can stock has thoroughly changed my culinary life. I make stock far more often now that I know I don’t have to clear out the freezer first — and I'm wasting much less from my produce drawer. Plus, I can now go from no dinner plan to totally homemade chicken noodle soup in less than half an hour.

Pressure canning does require some special equipment — namely, a pressure canner. (Unfortunately, standard pressure cookers cannot be used as a substitute; you need a pot that has either a weighted or a dial gauge. For more, see Ashley English's excerpt explaining pressure canning.) These days, they are quite inexpensive. The one I have cost all of $80 and has paid for itself several times over in the two years I have owned it. However, if that’s still too spendy, consider going in on it with a few friends or some preservation-minded neighbors.

I’ve now got the stock-making and canning process down to a science. Most often, I’ll set up my biggest slow cooker with the remains from a roast chicken, whatever veg needs to be used, and enough filtered water to come within a half inch of the top of the pot. I’ll let it bubble while I’m at work. Later that evening, when dinner is over, I’ll pull out some jars, fire up the pressure canner, and invest a little time one night that is certain to pay off over the course of many others.

h4. Basic instructions for pressure-canning stock:

# Place your defatted stock in a large pot and bring it to a simmer.
# While it heats, put the necessary number of jars (either pints or quarts) in the pressure canner. Fill the pot with three to four inches of water and put enough water in the jars to keep them from floating. Put the lid on the canner (you don’t need to lock it into place at this point) and bring it to a boil.
# Put the canning lids in a small saucepan, cover them with water, and place the pan over very low heat, in order to soften the sealing compound.
# When the jars are hot and the stock is simmering, remove one jar from the pot. Empty the water into the sink and carefully fill it with stock, leaving a generous inch of space between the surface of the stock and the top of the jar.
# Wipe the rim of the jar with a cloth dipped in white vinegar (to help cut any grease), apply a warm lid, and screw on a ring band.
# Place the filled jar into the pressure canner and repeat the process until all your jars are filled and the stock gone.
# Put the lid on the pressure canner and lock it into place.
# Bring the heat up and let the canner run with an open vent for 10 minutes. You want to get as much air out of the canner as possible. [%image gauge float=right width=400 caption="A pressure-canner gauge."]
# When the stream of steam coming out of the vent lessens, put the vent weight on the port. If you’re using a weighted pressure canner, choose the 10 pounds of pressure side of the weight.
# If you’re using a gauged pressure canner, watch your gauge. You need it to reach 11 pounds of pressure.
# Once the weight is jiggling the appropriate number of times per minute, or the gauge has reached 11 pounds of pressure, set a timer for 25 minutes.
# Keep tabs on your pot to ensure that the jiggles or gauge number don’t drop below their prescribed levels. You may need to reduce the heat to keep the pot where it should be, pressure-wise.
# When the time is up, turn the heat off under the pot and let it cool completely before touching. I tend to do my pressure canning right before I go to bed, so that I can leave it to cool all night long.
# When the pressure is totally down and the jars are cool enough to handle, remove the jars from the pot. Wash them (the stock often leaks a tiny bit during processing, which can make the jars a little grungy) and remove the rings.
# Label with the contents and date and store in a cool, dark place.
# Pressure-canned stock will keep up to a year on the shelf (although mine never lasts that long).
reference-image, l
gauge, l