primary-image, l
(post, Judith Klinger)
primary-image, l
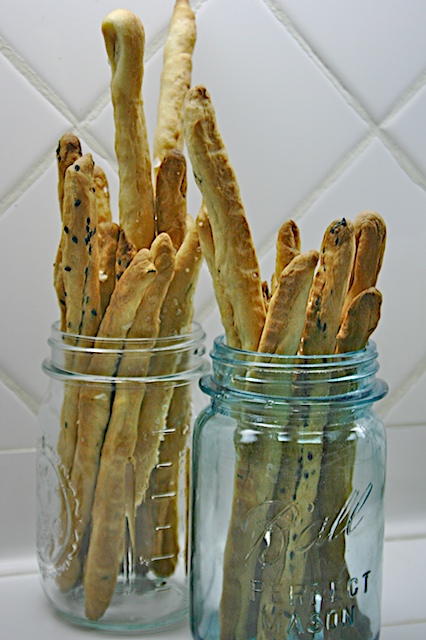
Making Bread Sticks is easy.

Everybody loves a bread stick or a grissini, as they are called in Italy. Fun and quick to make, they add a homemade touch to a cheese plate or a rustic accent to a simple pasta dinner. Oh come on, do you really need me to tell you when it’s a good time to eat a breadstick? No, I didn’t think so.

Here’s what you need:
250 g flour (about 1 ¾ cups)
125g water (scant 2/3 cup)
20g extra virgin olive oil (1Tablespoon + 1 teaspoon)
8g fresh cake yeast (1 Tablespoon)
5g salt (1/2 teaspoon)
12g honey (1 teaspoon)
1 or 2 baking sheet pans and some parchment paper

Yield: approximately 22 breadsticks about 8 inches long
Life is simpler, clean up is easier, cabinet clutter eliminated, and your recipes are more accurate if you use a scale.

Combine all the ingredients in a bowl and knead for about 5 minutes or until you have a yielding but resilient ball of dough.  I use bread flour, but you could probably use all-purpose flour and get good results. Seek out cake yeast. It gives much more reliable results than dried, powdered yeast. Cake yeast comes a fresh block of yeast; it’s not yeast that you use to make a cake rise. I get mine at an Italian food store, but I also saw it at Dean & Deluca’s the other day, so it’s around. Whole Foods probably carries it.

When your are finished kneading, wrap the dough ball tightly in plastic wrap and let it rest for about 15 minutes. An old Italian chef taught me this trick, and I’m a little fuzzy on the science, but something about the compression aids in hydration and gives you a more pliable dough that doesn’t tear or shred as easily.

While the dough is resting, chose some flavorings for your breadsticks. Today I used: chopped walnuts, black sesame seeds, dried oregano, fennel pollen. Other possibilities could be: grated cheese, grated cheese with smoked chili powder, fresh thyme, chopped olives, a smear of spicy tomato sauce. Let the contents of your kitchen be your inspiration. Less is more….use just a bit of topping, don’t cover the whole thing in cracked peppercorns, ok?

Preheat oven to 400F/204C.
Unwrap the ball of dough and roll it into a long tube, about 1 ½” in diameter. Don’t be too concerned if this long tube isn’t precisely even or round. You’re going to cut off chunks to make the individual bread sticks so you can adjust the bread stick size as you cut the chunks. One thing you need to do is keep all the bread sticks a fairly even thickness so they all bake at the same speed. I have seen some very creative breadsticks being made in some of my classes and it just breaks my heart to discourage creativity, but enormous renderings of body parts cook much slower, so you wind up with either your body parts are underdone or your sticks are burnt.

Place a small amount of topping on your work surface and gently pat the seasoning into the round ‘coin’ of dough that you cut from the tube. Using both hands, gently roll the coin into a breadstick shape; as your hands are rolling the breadstick, extend the dough lengthwise. As you do this, the topping gets rolled and incorporated into the breadstick.  When you have enough of one flavor of breadstick, clean up the board and move on to the next flavoring, otherwise you get bits and pieces mixed in and wind up with a tomato-walnut-black sesame mess.

Lay the little guys on a baking sheet that has been lined with a sheet of parchment paper, leaving an inch between the sticks. If you like a bit of salt, sprinkle a touch of salt over the raw breadsticks and give them a little roll to set the salt crystal into the surface. Just before going into the hot oven, I usually spritz the sticks with a bit of water, which increases the overall crunch factor.

After about 10 minutes in the oven, give the sticks a roll in the pan to expose their underbellies.
Total baking time is anywhere between 25-35 minutes, they’re done when they are golden brown. They may still feel a bit soft to the touch, but they crisp up as they cool. Every oven has hot spots, so depending on where you place the tray it will affect the baking time so it helps to rotate the trays while they are baking.

Let the grissini cool before putting them into any sort of container, otherwise you risk losing your crunch and getting condensation sog, and trust me, no one likes condensation sog.

If you are not planning to serve the grissini that day, you can freeze them in a zip lock bag. When you need some, put them into a 350F/180C oven for a few minutes until they are warm and crunchy. Arrange the grissini in a pretty glass jar, and watch them disappear.