reference-image, l
(article, Caroline Cummins)
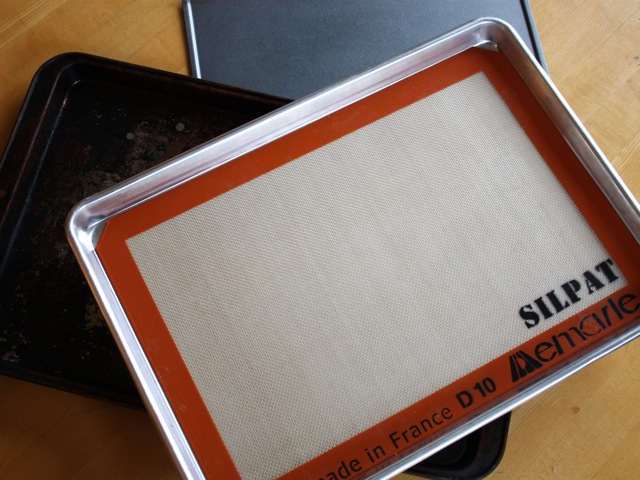
[%pageBreakSettings nobreak=true]

Over the years, I've bought several different brands and models of baking sheet. You can also call them cookie sheets, which is, admittedly, their most popular usage, but since I think of them as kitchen multitools, I refer to them as baking sheets.

What else can you use a baking sheet for besides cookies, you might ask? Well, for one, I use them to roast pretty much everything, from small garlic cloves to halved tomatoes to potato wedges to entire squashes. (OK, sometimes I halve or quarter a really big squash first.) For another, I stick one under anything that might ooze over and make a mess on the bottom of the oven, such as a juicy pie. (Better to scrape burnt sugary goo off a baking sheet, in my book, than off the bottom of the oven itself.)

[%image reference-image float=right width=400 caption="Clockwise from left: a battered consumer sheet, a nonstick sheet, and a half-sheet with a silicone baking mat inside."]

But, of course, I also make a lot of cookies on my baking sheets, as well as other desserty items such as meringues. And I've noticed that different sheets perform very differently in the oven. Depending on how you want a particular dessert to turn out, you can pick a sheet for its performance qualities. Here's an unscientific breakdown.

Thin sheets. These are the long, skinny, cheap kind that most people buy at big-box stores or the local supermarket when they're first outfitting a home kitchen. The chief problem with this type of sheet is an unfortunate tendency to warp (and to announce this with an audible crack) in a hot oven. You'll notice this when you open your oven door and are shocked to see a sheet torqued a few inches out of alignment. The warping goes away when the sheet cools down.

Some baking books will tell you to simply double up your cookie sheets if you have these thin ones, but the warping weirdness means that a) your sheets will probably warp against each other and b) fling your cookies around the inside of your oven.

Why would you layer two skinny cookie sheets together? Because thin sheets transfer heat quickly, which means cookies that brown fast and sometimes dry out too soon. Sometimes you want this in a cookie; sometimes you don't. If you don't, then you'll need to buy the next kind of sheet:

Thick sheets. As Hank Sawtelle pointed out in his column on baking mats, most professional cooks use something called a half-sheet pan, or a jelly-roll pan. These are wider and shorter than the standard pans sold in supermarkets; some kitchen stores have them, and all restaurant-supply stores carry them.

Half-sheet pans are marvelous: solid but not too heavy, easy to maneuver, and the exact size, as Sawtelle noted, for holding a Silpat silicone baking mat. (If you only have skinny baking sheets, you're stuck using parchment paper, because Silpats are too wide for standard consumer-market baking sheets.)

Thick sheets will take a bit longer to bake and brown cookies. And if you're using silicone baking mats on top of the sheets, the mats' extra thickness will add extra minutes to your baking time. This can be a minus, if you're eager to eat those cookies soon, or a plus, if you're the kind of person who gets easily distracted in the kitchen and forgets about cookies until smoke comes out of the oven.

But wait, the thick-vs.-thin argument ain't all. You also have to decide whether you want baking sheets with rims or without, with a dark finish or a light finish, and nonstick or regular aluminum. Here are the pros and cons:

Rimless. Skip the rims if all you want to make are light, delicate cookies for which you need total maneuverability with your flexible spatula to remove from the sheet. (Trying to scoop up a cookie wedged into a corner of a rimmed baking sheet is tricky at best and a mushed mess at worst.)

Rimmed. Half sheets are all rimmed, and so are many consumer sheets. If you want to do any roasting, you'll need rimmed sheets, which keep food from sliding off the sheet into the oven. (And yes, even some cookies can slide off easily, once they're done cooking.) Frankly, in my house we have several rimless sheets, bought before we even noticed that some sheets came with rims and some without; we seldom use them now, as too much food has hit the kitchen floor.

Dark finish. Some bakers prefer dark finishes on the theory that a dark finish browns cookies faster.

Light finish. A light finish, however, lets you distinguish your cookies better against the light background, to see whether they're browning properly.

Nonstick. These sheets are, by definition, dark-finish sheets. A nonstick coating is only important if a) you don't want to bother with parchment paper or silicone baking mats, b) you hate the mess of greasing your cookie sheets, and c) you don't worry about the chemicals in a nonstick finish getting too hot and off-gassing unpleasant toxins. (Cookies baked at 350 degrees are probably not a big toxins deal, but vegetables roasted at 450 degrees might be.) Watch out for putting together a nonstick sheet with a metal spatula, too — that smooth finish can get nicked and scratched right quick if you do.

Ordinary aluminum. This is the industry standard, and while plain aluminum sheets can be a mess to clean up if you use them to do a lot of roasting, they're incredibly durable; even those warping thin ones last forever.

Finally, one last tip: Check your dough temperature. A warm dough, soft from freshly beaten butter or from a lot of handling, will bake up into flat, oozy cookies, and a warm, greased cookie sheet will only hasten this process. Prevent it (unless, of course, you want thin, spread-out cookies) by doing two things:

# Stick your dough in the fridge or even the freezer to chill for 20 minutes or so before forming it into cookies.
# Use parchment paper or silicone baking mats instead of butter on the sheets.

If all else fails, break up the cookies, scatter them over ice cream, and call it good.

p(bio). Caroline Cummins is Culinate's managing editor.
reference-image, l